Do Better Airbnb Photos Improve Your Ranking? (Yes, Here's How)
Published on 4/22/2026
You probably already know that good photos matter on Airbnb. But here is the part most hosts miss: Airbnb scores your photos the moment you upload them, and that score feeds directly into where your listing shows up in search.
This is not about making your bedroom look prettier than it is. It is about understanding that every editing decision you make, from how you handle white balance to whether your gallery looks visually consistent, sends a signal to Airbnb's algorithm. Get those signals right, and your listing climbs. Get them wrong, and you are invisible regardless of how good your space actually is.
Listings with professional-quality photos earn 40% more bookings and a 26% higher nightly rate, according to Airbnb's own data. That gap is not explained by the photos alone. It is explained by what those photos do to your ranking, your click-through rate, and a guest's confidence before they ever hit "Book."
Here is how to close that gap yourself.
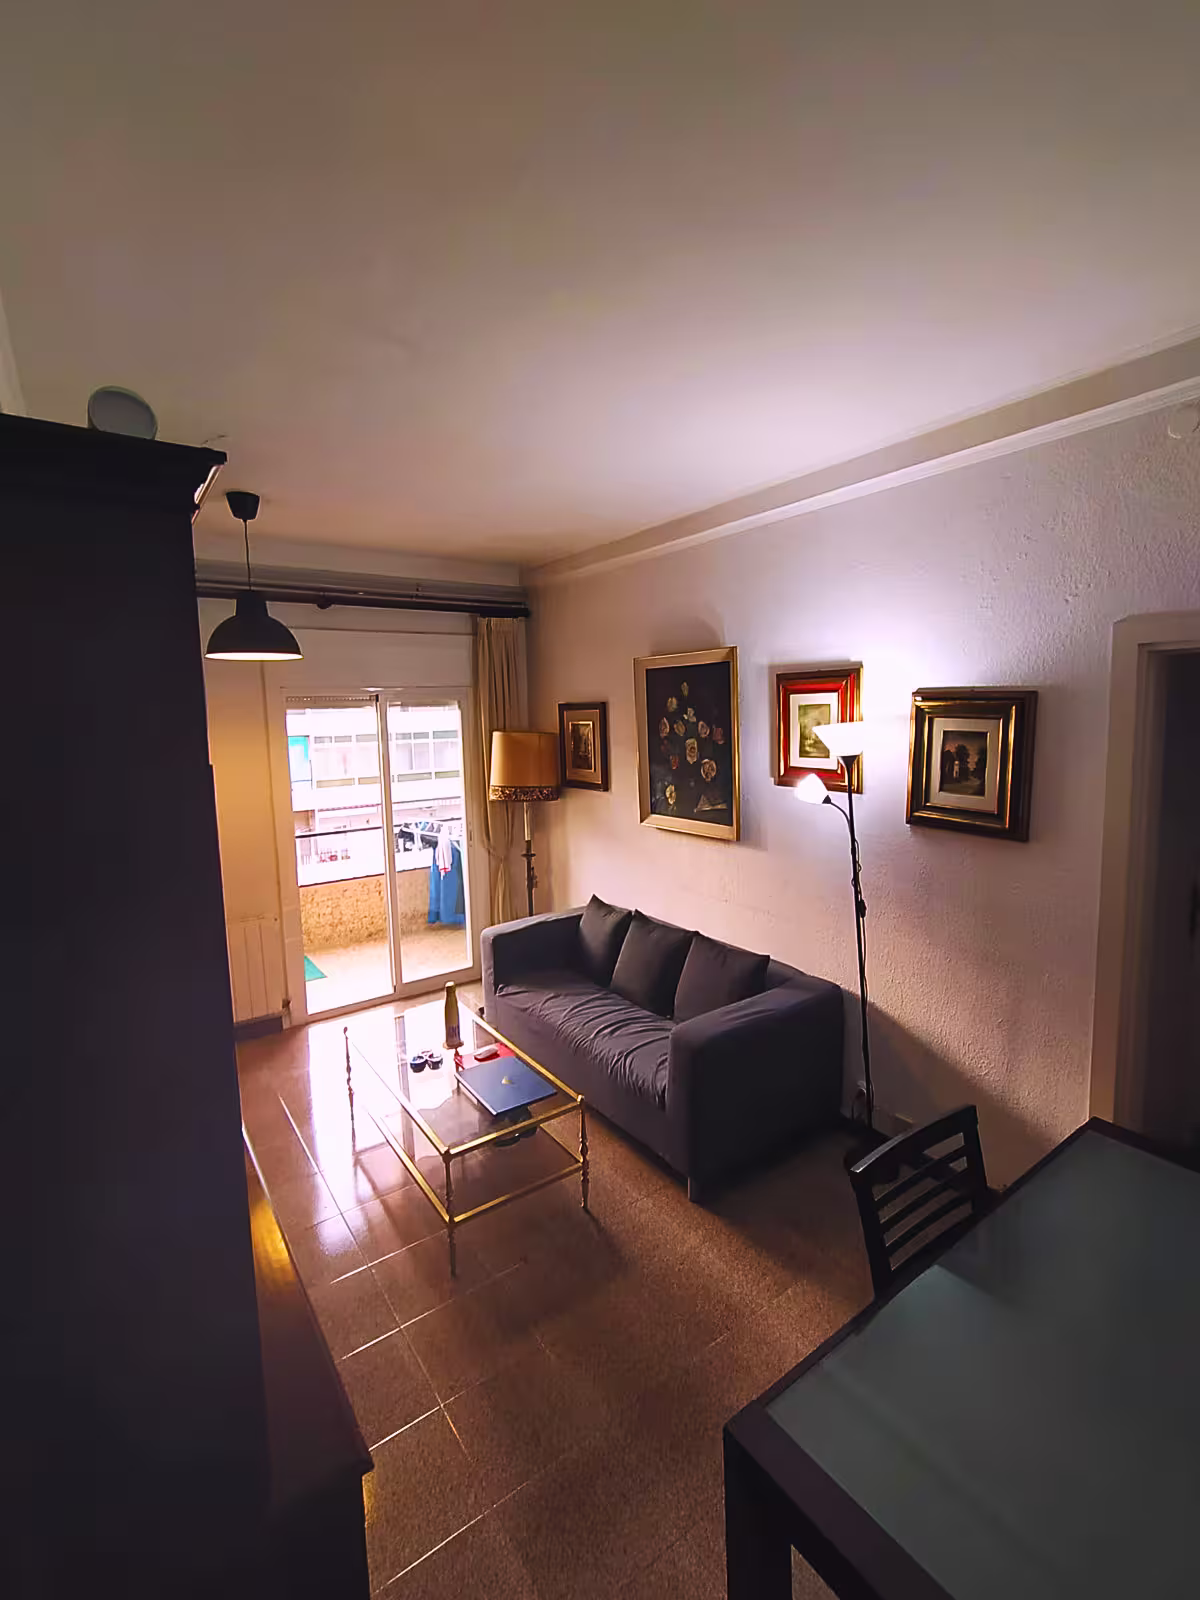
 Before
 After
AfterThe same Airbnb photo before and after correction. Better exposure and white balance improve both click-through rate and algorithmic score.
Why Airbnb Cares About Your Edit Choices (Not Just Your Guests)
Airbnb runs a computer vision algorithm that evaluates every photo you upload. It is looking at technical quality indicators: sharpness, exposure, colour accuracy, composition, and visual coherence across your gallery. This score is a ranking signal. It influences where your listing appears in search results for a given location and price range.
Most hosts think of photo editing as something they do for the human eye. A brighter photo looks nicer. A straighter shot looks more professional. That is all true, but it is secondary. The primary audience for your edit decisions is a machine making a quality judgement in the background before any guest ever sees your listing.
That changes how you should think about this. You are not just making photos look good. You are meeting a technical standard that a non-human system is checking.
What Airbnb's Algorithm Actually Looks For in a Photo
The algorithm evaluates photos on several dimensions that map almost exactly onto the decisions you make during editing.
Exposure and brightness. Underexposed photos (too dark) and blown-out photos (too bright) both score poorly. The target is even, natural-looking light with visible detail in both shadows and highlights.
Colour accuracy. Colour casts, which is when a room appears orange from tungsten bulbs or green from fluorescent ones, are a quality signal failure. The algorithm expects colours to read as natural and true-to-life.
Sharpness. Blurry photos get scored down. This is partially a shooting problem, but sharpening in post can recover detail that a handheld shot loses.
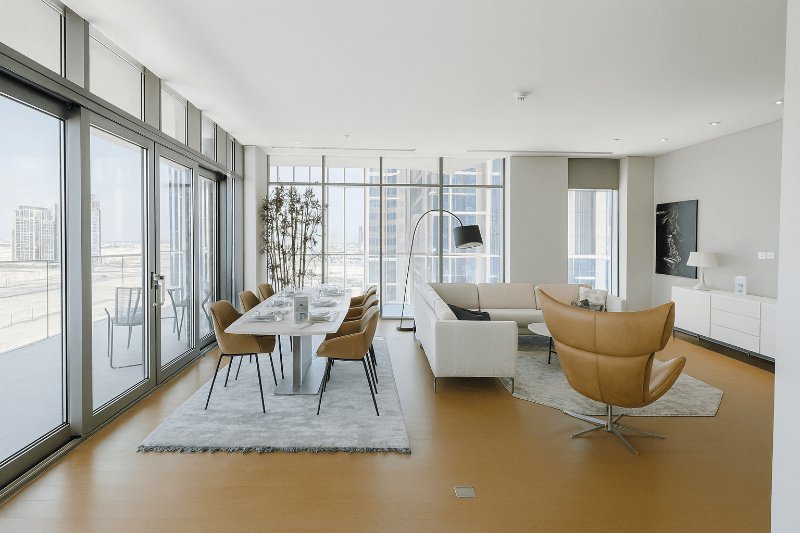
Composition and framing. Wide shots that show full rooms score better than tight crops. Straight vertical and horizontal lines (no tilted walls or converging verticals) signal professional quality.
Gallery consistency. This is the one most hosts do not think about. If your living room is edited warm and golden, your bathroom is cold and blue, and your kitchen is dark and moody, the algorithm reads that as inconsistent quality. A gallery should look like it was shot and edited as a unified set.
The Mobile Crop Problem Nobody Mentions
Here is something that will change how you choose your cover photo.
Airbnb displays your cover photo at a 3:2 ratio on desktop. On mobile, it crops to a square. If your cover photo has your main subject (a beautiful bed, a stunning view, a standout living room) centred top-to-bottom in the frame, it looks fine on both. If the key subject is near the top or bottom of the frame, mobile guests see a cropped version where it is cut off or barely visible.
Pull up your listing on your phone right now. Look at what actually appears in the cover photo square. If it is ceiling or floor instead of your best feature, you need a different cover photo or a reframed shot.
The fix is simple: when shooting or cropping your cover photo, compose for a square. Put your hero subject in the centre third of the frame vertically. Confirm it looks right on both desktop and mobile before publishing.
This matters more than most editing decisions because the cover photo has a disproportionate impact on whether someone clicks your listing at all. No click means no booking, regardless of what is inside.
What Editing Is Allowed and What Will Get Your Photos Rejected
Airbnb's content policy is specific about one category of edit: you cannot misrepresent the space. That means:
- Removing walls or structural features to make a room appear larger than it is: not allowed
- Adding furniture, art, or decor digitally that is not actually in the space: not allowed
- Digitally removing clutter or objects that would be present during a guest's stay: not allowed
- Changing the view from a window to something more appealing: not allowed
What is allowed is everything that corrects the limitations of photography rather than misrepresenting reality. Adjusting brightness and contrast so the room looks as bright as it actually feels in person: allowed. Correcting white balance so walls appear their actual colour instead of orange: allowed. Fixing lens distortion so walls look straight instead of bowing: allowed.
In 2024 and 2025, Airbnb introduced a basic AI photo enhancement feature inside the host dashboard. It handles brightness and contrast adjustments automatically. It does not fix perspective distortion, does not correct white balance, and does not address consistency across a gallery. It is a starting point, not a solution.
The practical rule: if a guest walked into your space and it looked substantially different from your photos, you have crossed the line. Edit to show the space accurately at its best, not to show a space that does not exist.
The Five Edits That Move the Needle
 Before
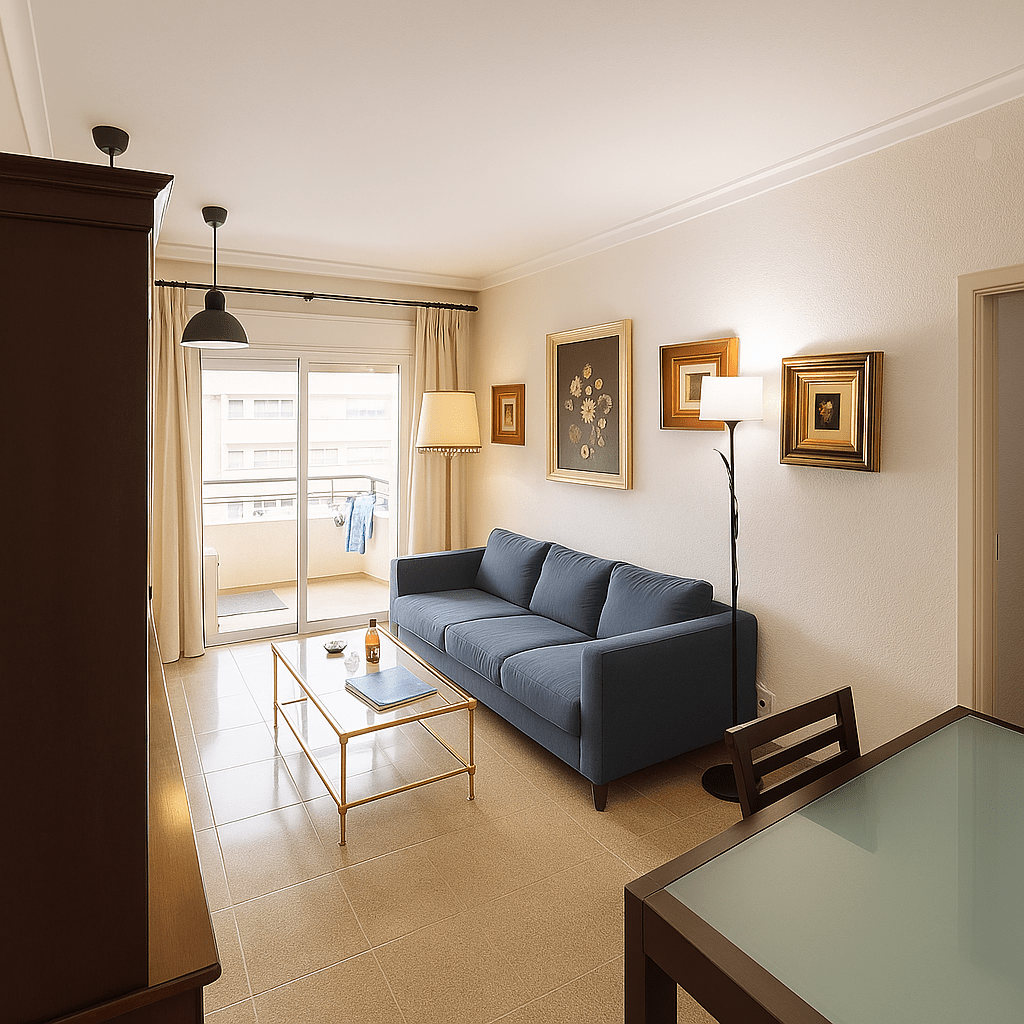 After
AfterExposure, white balance, and perspective corrections on a single room photo.
Lighting
Raise the exposure until the room looks naturally bright, then bring down the highlights slightly to recover any blown-out areas (windows, light fixtures). Lift the shadows to reveal detail in darker corners. The target is an image that looks like the room on a bright day with the lights on, which is usually how it looks when guests arrive.
White Balance
This is the single most impactful edit most hosts skip. If your room has a colour cast, correct it. Tungsten bulbs push orange; fluorescent lights push green; shade pushes blue. In Lightroom, Snapseed, or even VSCO, move the temperature slider until walls read as white or their actual colour.
Perspective
Keystone distortion makes vertical lines tilt inward toward the top of the frame, which happens with wide-angle lenses aimed even slightly upward. Fix it using the perspective or geometry correction tool in any editing app. Straight verticals signal professional photography to both the algorithm and the human eye.
Sharpness
Apply light sharpening to recover detail. Do not over-sharpen. If you can see grain or noise, reduce noise first, then sharpen on top of it.
Consistency
Edit all your photos in the same session using the same settings as a starting point. In Lightroom, edit one photo, then copy and paste the settings across the rest, adjusting only where individual photos need it. This is the editing decision that most directly affects your algorithmic consistency signal, and it is the one most hosts ignore because they edit photos one at a time over days or weeks.
Best Apps and Tools: From Free to AI-Powered
Snapseed (free, mobile). Excellent white balance and perspective correction tools. The healing brush handles small distractions well. Good for editing individual photos on the go.
VSCO (free tier available, mobile). Strong for applying consistent presets across a gallery. Less precise than Snapseed for technical corrections.
Lightroom Mobile (free tier available). The best free option for hosts who want to edit a full gallery consistently. Copy-paste settings across photos, precise controls, non-destructive editing.
Adobe Lightroom Classic (desktop, subscription). The professional standard. Batch editing, full perspective correction tools, precise noise reduction. Worth it if you manage multiple listings.
ProntoPic (AI-powered, $1.50 per photo, no subscription). Handles brightness, white balance, perspective correction, sharpness, and gallery consistency as a set. Designed to stay within Airbnb's content policy because it corrects photographic limitations rather than altering the space. At $1.50 per photo, a full gallery of 20 photos costs $30 with no ongoing commitment.
How to Edit a Full Gallery in Under 10 Minutes
This assumes you are using Lightroom Mobile or a similar app with copy-paste or batch functionality.
Step 1 (2 minutes): triage your shots. Delete any photo that is blurry, poorly composed, or simply a bad shot. No amount of editing rescues a fundamentally bad photo.
Step 2 (3 minutes): edit your hero shot first. Choose your best room, usually the living room or bedroom that will anchor your gallery. Fix the exposure, correct white balance, straighten the perspective, apply sharpening. Get this one photo looking exactly right.
Step 3 (1 minute): copy settings. Copy all your edits from the hero shot.
Step 4 (3 minutes): paste and adjust. Paste settings across every remaining photo. Go through each one and make small individual adjustments where exposure or white balance differs because of the room or time of day. You are not re-editing each photo from scratch. You are tweaking from a consistent baseline.
Step 5 (1 minute): check for consistency. View all photos as a grid and look for any outlier that looks dramatically different in tone or brightness. Fix it.
The whole process takes under 10 minutes once you have done it once. The first time takes longer because you are establishing your baseline edit.
Frequently Asked Questions
Does Airbnb actually use photo quality as a ranking factor?
Yes. Airbnb's computer vision algorithm evaluates photos at upload and uses quality scores as a ranking signal. This is documented in how Airbnb describes its search algorithm, which weights listing quality alongside price, reviews, and availability. Photo quality is not the only factor, but it is one of the few you can improve directly without changing your price or waiting for more reviews.
What size and format should Airbnb photos be?
Airbnb recommends photos be at least 1024 x 683 pixels at 72 DPI, with a 3:2 aspect ratio. Larger is better: uploading at 3000 pixels wide gives the algorithm more to work with and future-proofs your listing as displays improve. JPEG is the standard format.
Can I use AI tools to enhance my Airbnb photos?
Yes, with limits. AI tools that correct photographic issues, including exposure, white balance, sharpness, and lens distortion, are within Airbnb's content policy. AI tools that alter the space itself, adding objects, removing walls, changing the view, are not. Airbnb's own built-in AI enhancement only handles brightness and contrast, which is a narrow subset of what most photos need.
How many photos should my Airbnb listing have?
Airbnb allows up to 100 photos. Data consistently supports having at least 20 to 25 high-quality images. More photos give guests confidence and reduce pre-booking questions. Quality over quantity: 20 excellent photos outperform 50 mediocre ones every time.
If your photos need technical corrections and you would rather not spend an afternoon in Lightroom, upload them to ProntoPic and have your gallery back in minutes.
See the difference on your own photos
Upload a photo and get a professional-quality result in 30 seconds. First 3 photos are free, no credit card required.
Enhance a photo for free